|
Nobody's pretending you can learn an instrument like the Cello without the help of a
good teacher. However, the beginner lessons on 8notes.com are designed to introduce you to the instrument
and help you take your first steps - perhaps to
see if you like it before you start paying for expensive lessons.
By the end of this three-part lesson our intention is to have you playing Beethoven's 'Ode to Joy'. You'll have
a basic understanding of what the instrument is all about - and whether is going to become part of your life...
Parts of the Instrument
First let's get to know the names of the various parts of the instrument, starting from the top and
working our way downwards.
-
The Pegs and the Scroll
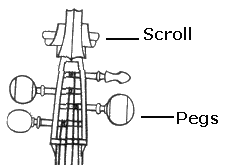
The scroll is the ornamental curve at the very top of the instrument. The pegs are used for tuning the instrument.
The four cello strings are each wrapped aroung a peg. Turning the peg raises or lowers the pitch of the string.
-
The Neck and the Fingerboard
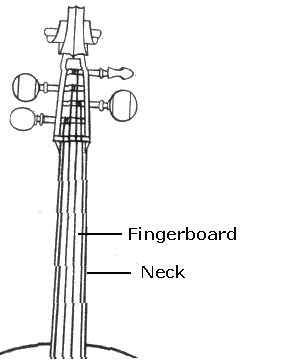
The terms 'fingerboard' and 'neck' both refer to the long piece of wood coming off the main body of the cello. The
neck refers to the entire length in a general sense, whereas the
fingerboard refers specifically to the black front of the neck - the fingers push the string down onto the
fingerboard to make change the note.
-
The Bridge and the F Holes

The bridge is the small piece of would that holds the strings in tension away from the body of the instrument. The
f-holes are the f-shaped holes in the body of the cello, that allow the sound to escape from inside the cello.
-
The Tail piece and the spike

The tail piece is the black plastic object that holds the strings at the bottom of the cello. The spike is the sharp metal
object underneath the cello. It is used to rest the cello on the ground and prevent it from slipping.
Sitting Position
Always seat upright with a straight back and both feet on the floor.
Try to rest the cello between your knees and position the neck of the cello an inch above your shoulder.
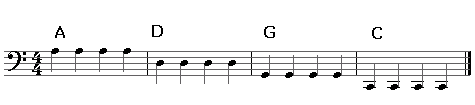
The 4 Strings of the Cello
Let�s plunge straight in and learn the names of the 4 strings.
On the cello the highest string is on the left side as you are sitting with the instrument. You can also tell that it is the highest one because of its thinness.
It is called �A�.
Moving downwards the names are: D, G and C (the thickest one).
The easy way to remember their names going is to have a saying like:
�Cats Go Down Alleys�
Before we talk about the bow, lets pluck all those strings with the first finger of the right hand. Pluck the
string in the gap between the bridge and the end of the black fingerboard.
Click on the play button to hear how this should sound.


Here's another exercise to try, again simply plucking the strings with the right hand. Try to pluck in
a regular rhythm.

In the next lesson, we will introduce playing with the bow. The lesson is already written, it just needs tidying - so please check back very soon!
|
