Now that your flute is assembled, you have to hold it in an effective playing position.
Since your fingers will be resting on keys, we need to discuss the two different kinds found on flutes. Professional flutes are sometimes referred to French models, also called "open hole." This means many keys have a hole in the middle which the pad of your finger covers when closing the key. Frequently flutes manufactured for students or beginners have closed, covered keys. This style is referred to as "plateau." An open hole flute can be temporarily modified into a plateau by purchasing a set of plugs which fill the holes. The reverse is not possible for a plateau flute.
If your flute is an open hole flute, this means you will have to be precise when closing keys because you have to both close the correct key and make sure the pad of your finger is centered over the hole to prevent air leaks. If a key is not completely sealed, you won't get the note you expect.
If your flute is an open-hole model and you are having difficulties you might consider purchasing a set of plugs. A temporary solution is to use small squares of masking tape, or some other easily removable tape (not cellophane or "scotch" tape), to cover the holes, though this is not ideal.
Good hand position is crucial to playing any musical instrument, including the flute. Drop your relaxed hand to your side and let it rest there a moment. Notice how your fingers are slightly curved. This is caused by muscle tone. When holding your instrument make sure your fingers, and thumbs, retain this natural curve as much as possible. It takes muscle tension to straighten fingers so if you play with straight fingers your hands will tire sooner than if they're curved.
Another detail to keep in mind is the flute, like virtually all wind instruments, is held by the fingertips, not the hand. We are used to grasping things, holding them in our hands with our fingers wrapped around them. This is not the case with your flute. The palms of your hands will not come in contact. Try to avoid the natural tendency to scrunch your palms up against the instrument.
Take a look at the following illustration:
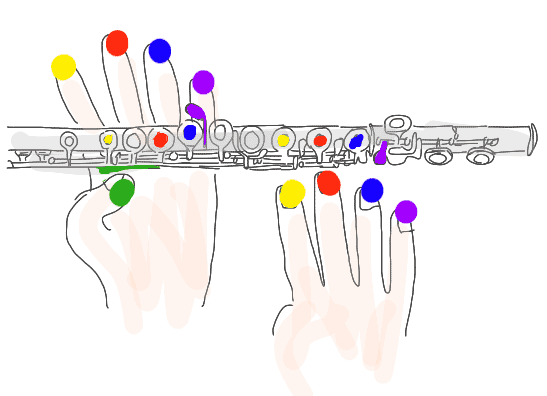
This will show you which keys your fingers rest upon. Notice with the left hand your first and second fingers have an extra key between them. Notice on both hands your pinky finger does not cover a hole, but instead has it's own dedicated key. Although some fingers have other keys the can play, these are the primary keys they will play and this is where you should rest your fingers.
You can not really hold the flute properly until it is brought up to your mouth which creates difficulties because you cannot see much of anything when the flute is in playing position, so now you need to find a mirror you can sit in front of.
Study the next picture for a bit:
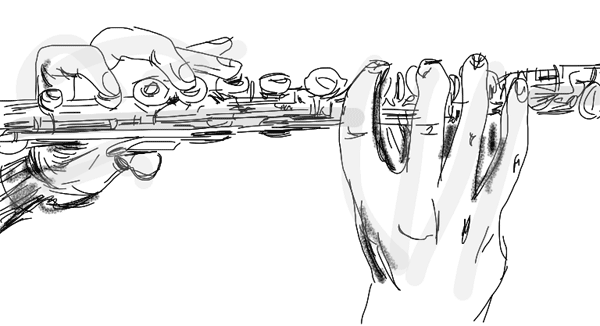
This is a good representation of what your hands will look like when the flute is brought up to you mouth to play.
The flute rests on the lowest section of your left hand's index finger. This part of the finger meets the underside of the flute body between the two topmost keys. The finger curves around the flute a bit, like a question mark, before resting on the key. The hand will turn slightly counter-clockwise to face towards the right, or down the flute, which will make it easier to reach the other keys. Stretch them out until they rest on the other keys and your pinky can easily reach its key if necessary. The third finger will almost, but not quite straighten.
The right hand rests comfortably on the keys as shown, with your pinky resting on the first foot joint key. Because it is longer, your middle finger will be slightly more arched than the other fingers.
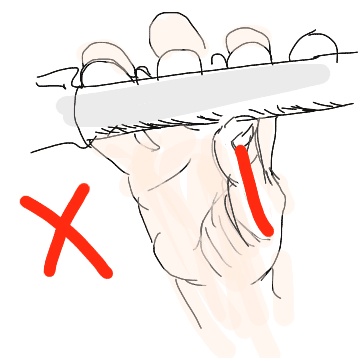
Thumbs should be slightly curved as much as possible (see illustration).
Wrong - straight thumbs:
Correct - curved thumbs:
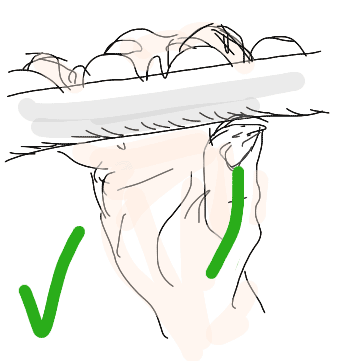
The left hand thumb has two different keys it can play. Normally it will play the smaller key.
Your right hand wrist should be as straight as possible:
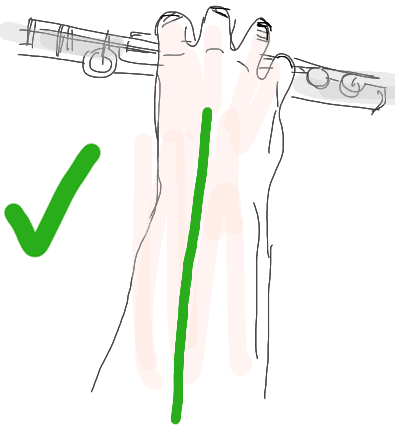
not bent:
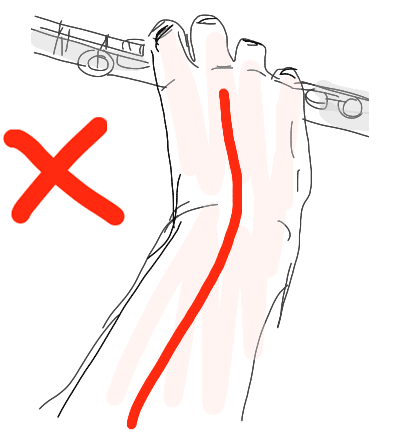
Whatever you do, do not let the first joint of any finger bend backwards. This is a no-no for virtually every musical instrument. Keep the first joint of your fingers strong and slightly bent.
Your elbows should be comfortably down. Picture the flute as pivoting on the left index finger, so that it acts as a hinge. Any amount of guiding the foot joint away from you will bring the headjoint closer to your chin. Experiment with this.
The main points of support will be the underside of your left hand index finger, the pinky of your right hand (which depresses its key most of the time) and your thumbs.
When you bring the flute up to your mouth, just like with playing on the headjoint, the flute needs to be level (see illustration).
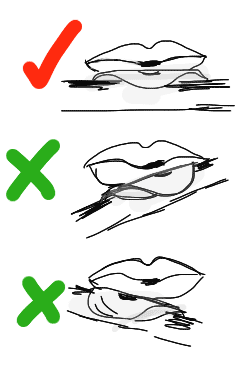
As you can see from the picture below, the flute is not parallel to the shoulders.
Turn your chair to the right at approximately a 45 degree angle, then turn your upper body and your head so that you're looking over your left elbow.
The flute should make an angle or pie-shaped wedge between the line of your shoulders and the line of the flute's body. Guiding the foot joint away from you with the right hand should allow a relaxation of your left shoulder down and into its socket.
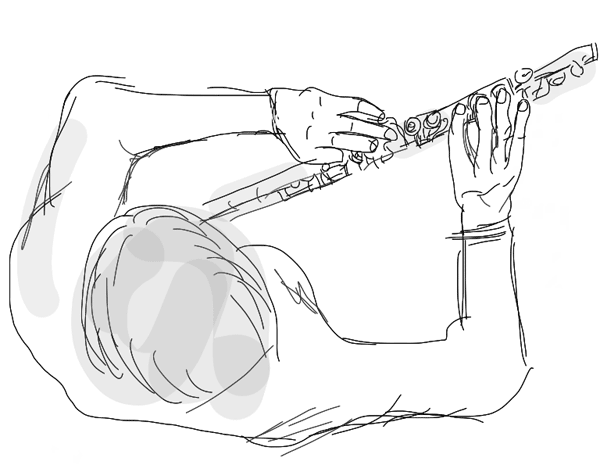
Don't worry if this seems like a lot of details to keep track of. After a bit of practice this will seem natural.
Once you are comfortable with this you will be ready for the next lesson and your first note!
 Beginners Flute Part 1
  Beginners Flute Part 2
  Beginners Flute Part 3
  Beginners Flute Part 4
  Beginners Flute Part 5
  Beginners Flute Part 6
  Beginners Flute Part 7
 Beginners Flute Part 8
  Beginners Flute Part 9
  Beginners Flute Part 10


